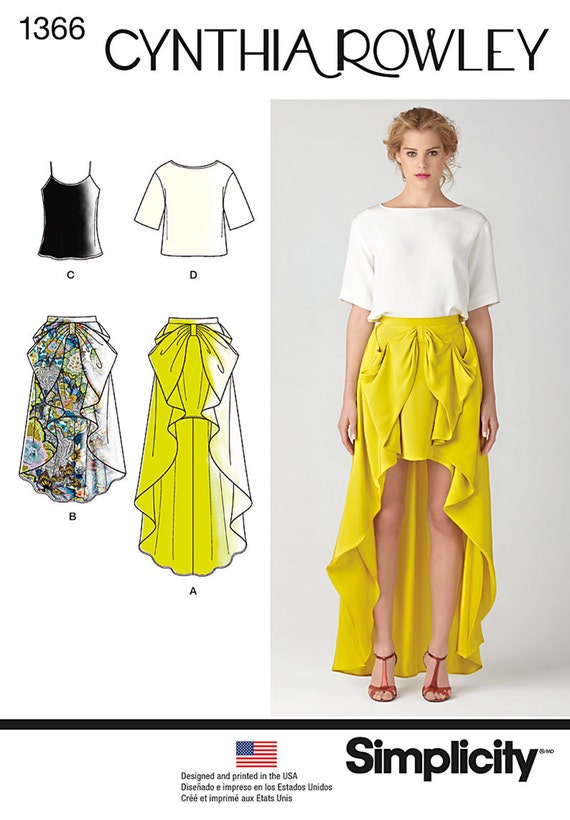
I was very excited when I saw this skirt in the Simplicity catalog this summer. Sure - it has alot of things going on at one time, but I was drawn to the interesting design. And, I had the perfect fabric to experiment with - a wonderful turquoise lightweight linen from a "Brown Bag Challenge" from my local sewing group.

What's a Brown Bag Challenge you ask?? Let me explain. I've mentioned previously that our sewing guild chapter has an annual garage sale. Of course at every garage sale, not everything is sold and the remaining fabric is distributed to various charities in the area. A few of the "lovely" pieces (I say that sarcastically) are saved for our small group to do a challenge project with. Each "lovely" piece is placed in a brown paper bag and everyone in the group gets a chance to select one - without peeking of course and we are given two months to sew something from whatever was in our bag. We make a game of it by being able to steal someone else's fabric when your number comes up and of course I stole this one from another member of our group (sorry by the way!). Our projects are due this month so I'm glad I finished in time. I can't wait to see what everyone else comes up with - we have some very creative people in our group. If you would like to see what I made last year for this challenge, please click here.
Yikes - but as I started to turn around - my derriere was looking huge! (Notice the side seam points towards the back as well - I'm come back to this later)
OMG! Does this make my butt look big?!?! I think so!!! The pattern calls for a total of 6 pleats across the back which in my case, was not a good thing. I even tried pressing them flat and it didn't make a difference.
I mean really, who wants this much fabric back here??!?! Maybe, just maybe if my fabric was a little more drapey it might work, but this linen was shouting loud and clear that there was way, way too much fabric. So, out comes the seam ripper to remove that invisible zipper and rework the back.
I opted to make the back more fitted. I removed 6 inches from each center back piece (for a total of 12 inches) and added two fitting darts (one on each side). Ahhh, this is looking much, much better.
The side seam still points towards the back, but maybe just a little more exaggerated now that the back is fitted.
And here's the finished product. I really don't like this straight-on view, but it gives you a better idea of the draping on the front flap pieces. The pattern suggests that you tack the flaps in just two places, but I didn't like the look of that and opted to tack it in 3 places.
Another view - you can see more of the draping here.
Another view.
Back view - The zipper really is straight - I think I'm just standing funny in this picture.
And a view without the sweater. I need to make a white t-shirt to go with this so I can wear it to work.
Overall, I'm pretty happy with this skirt - it's a unique, one-of-a-kind design. I'm sure the linen will wrinkle like crazy the first time I wear it too.
Until next time,
Happy Sewing!

.jpg)
.jpg)
.jpg)
.jpg)
.jpg)
.jpg)
.jpg)
.jpg)
.jpg)
.jpg)
.jpg)
you look so super cute
ReplyDeleteThanks cloeber!
ReplyDeleteI followed you from patternreview so I could see your more detailed description of making your skirt. It's really nice and I like your version much better than the pleated one. But I've got to tell you, I'm soooo jealous of your muscles! Holy cow, you must work out a lot. You look GREAT.
ReplyDeleteThanks Brenda for both the compliment on the skirt and the muscles. I'm blushing at the moment! I do try to workout everyday pretty much at work. Glad to see it's paying off!
DeleteThis is so pretty! I love the draping along with the color, it's really flattering!
ReplyDelete(Found your blog through Sally's Summer Stash Bust :) )
Thanks Midwestcoastsewist!
DeleteThis is gorgeous! I love the contrast between the straight back and the floaty front side. And great color, too!
ReplyDeleteI just bought this pattern and saw your review on PatternReview. Wow, I love the modifications you made to the back and also the length. The original length is crazy short! Thanks for sharing your edits -- I will probably be using them! Super helpful.
ReplyDeleteThanks. Glad to hear my review was helpful. I thought the skirt was way too short as well. If your fabric is very drapey the pleats might work for you but as you can see, they did not work for me so I modified the back.
DeleteYours is they only made up version of this skirt I can find - but it's cute enough to convince me I should give it a shot! I like the idea of removing the back pleats too, it looks great more fitted on you.
ReplyDeleteThanks bowsandbunnies and good luck with your version.
DeleteI just bought this pattern. Is it possible to make skirt B but just as a belt and train?
ReplyDeleteI’m not sure what you mean by a belt and train. If you are referring to the skirt without the overlay in front, then yes, that is possible.
Delete