Pages

Showing posts with label Organizing Tips. Show all posts

Thursday, April 2, 2015

Pattern organization on the go

I like to think I'm a fairly organized person when it comes to sewing.

-  Trims, zippers and buttons are color coded in separate containers.
- Magazines and articles are stored in either magazine holders or binders according to year or topic.
- All of my patterns are organized in boxes according to manufacturer.
- All of above mentioned patterns are also photocopied, both front and back, and in separate binders sorted by categories (dress, blouse, pant, etc.).

These binders are great for when I'm at home sewing away because I can just grab a binder and start flipping thru the pages to see which garment I want to sew next, but what about when I'm shopping and see there is a pattern sale or the perfect piece of fabric for a dress and I don't know how much yardage to buy?  Although I'm organized at home, this organization does nothing for me when I'm out and about.  I can't remember exactly every pattern I have at home and sometimes these sales have led to purchasing the same pattern twice or buying too much fabric.

So, I started looking on-line for a sewing app that I thought would fix my need for a portable personal pattern catalog.  I looked at several different apps, one app specific for notions, another one just for the fabric stash, but all of them seemed to have either technical issues and weren't supported anymore, or they didn't seem to be exactly what I was looking for.  I figured what I really needed was a database of sorts.  Then it hit me - why not see what other bloggers are using? Duh!  Why did it take me so long to think of that!

After some time spent poking around on other blogs about pattern organizing ideas, I finally found the solution I was looking for!  Tap Forms.

iOS Icon

Tap Forms is a fabulous little app.  It did cost $8.99 to download, but this seems to be the answer to my pattern problem.  The app comes with 26 suggested forms (or databases) already included.  You can either use one of their already suggested forms, or create your own.  I decided to create my own. The fields I have on my pattern form are:

- Pattern Front - This is a picture of the front of the envelope.
- Garment Type - Dress, Blouse, Pant, etc.
- Manufacturer and Number
- Designer
- Pattern Back - This is a picture of the back of the envelope.

Here are some screen shots of the app in action on my phone.

You can select how you would like your forms to be alphabetized and I opted for Garment Type.


When you select a particular pattern - it will open up into this view.  Here's the top half of the view:

And here's the bottom half of the view.  And the best part is - I can click on the photo within the form and enlarge it.  So, if I'm shopping for fabric for a particular garment, I can click on the pattern back and zoom in to see exactly how much yardage is needed and avoid buying too much!


If you happen to be at a store and there is a sale - you can search for patterns as well to see if you already own them.  The search feature is great!

When I first started this project, I had no idea how many patterns I owned.  As you can see - I currently have 641 patterns - which is quite alot - and this is after purging over 100 from the stash.   I don't know if I should be proud of that fact or a little embarrassed - whatever the feeling, at least I'm organized now.  I worked on this project a little bit every night and to photograph and catalog all of my patterns took me about two months to complete, but now that it's all done - I will never buy the same pattern again!

My next project is to catalog all of the fabric I have in my stash.  This too will take quite awhile, but will be well worth it when it's finished.  If you are looking for a portable pattern solution - I highly recommend using Tap Forms.

Until next time -
Happy Sewing everyone!
Star


Friday, March 7, 2014

Sewing Machine Feet Organization


Just a quick idea for everyone today.  If you have alot of extra feet for your sewing machine/serger that need a home, how about using a plastic organizer such as this.  These are available at any craft store and are used for sorting needlework floss or other small items, but they were great for machine feet as well. Just add a little label, and one more item in your sewing room is organized!


Happy Sewing!

Sunday, January 12, 2014

Sewing Organization Tip #7

Thread - there are so many different kinds, shapes, purposes, etc.  What do I do with all of them?

I keep all of my thread in the closet in my sewing room.  There was an unused corner of the closet and it was just perfect to mount these thread spool racks to the wall.  I have them from floor to ceiling on one side of the closet.

I like to store my thread in the closet because they are out of direct sunlight - which leads to deterioration of the thread over a long period of time.  Some of the serger spools, I have owned for quite while.


Here's the rack near the ceiling.  I need a little step stool to access the ones nearer the top, but that's ok.  The step stool tucks away nicely in the closet as well.

Another idea for thread storage is to use the nuts and bolts bins like I showed in Tip #5.  I store all of my rayon machine embroidery threads in the top bin.  On the bottom, I have some very small spools that fit just perfectly in these drawers, alongside some more beads and larger buttons.


This concludes my series on sewing organization tips.  I hope you have found them to be useful and will try a few!

Happy Sewing!

Saturday, January 11, 2014

Sewing Organization Tip #6

Help!  I can't see the top of my desk!

This one took me a while to come up with a solution.

When I'm working on a project - it tends to cover up my entire desk, the computer, the cutting board and spill onto the floor.  And the worst part is, I tend to just close the door to my sewing room and leave it that way only to find I need to move everything just to get to the computer or find something buried under the pile on my desk.

So, I decided I needed some project bins.  I found these cute bins at Target last year for about $8.00 each.  Now when I'm finished working on something, I just grab a bin, throw everything into it and put it into my closet on a shelf tucked between the organized trims and patterns.  Then, when I have another opportunity to sew, I just pull out the bin and everything I need is in it and I can easily pick up where I left off.  I'm not looking for the buttons I left on the cutting board or the lace that fell on the floor - everything is tidy, organized and in the project box.

One of my three project bins

Don't they look happy on the shelf?
Tomorrow's topic - Thread tails.....

Happy Sewing!

Friday, January 10, 2014

Sewing Organization Tip #5

Buttons and Hooks and Snaps - Oh My!

I'm sure you've had a button box.  I remember as a kid looking thru my Grandmother's button box trying to find the perfect match for a garment she was making for me.  I would occasionally come across various hooks and snaps in the box too.  This task used to keep me entertained for a while as a kid, but now I need to find what I need quickly and not dig thru multiple boxes for the right item.

As I mentioned in my earlier post of the wonderful neighbor, I have alot of buttons, snaps, hooks and eyes, grommets, needles, beads, etc.  Basically, if it's sewing related and comes on a card or in a small box, chances are that I have alot of them.  So again, what to do with all of them?

My solution:  The Nuts and Bolts bins you purchase at the hardware store.

I have four of them and they hold all of my buttons (color coded of course!), snaps, hooks and eyes, beads, needles, etc.  Pretty much everything that is small and needs a home, ends up in one of these bins.


Anyone need a snap for jeans?  They have their own little drawer

How about some black buttons?

Or some red, white and blue snaps?
These bins are kept in my closet and help to keep everything organized and dust free.  Now when I need something, I just head there first and chances are I have what I need without another trip to the store.

These bins are anywhere from $10 - $25 in the hardware store.  They may not look very pretty, but they work perfectly for this job.  Once the crafting industry gets wind of this idea, I'm sure they will start being manufactured in pretty colors and cost twice as much!

Tomorrow's topic - My desk is a mess!

Happy Sewing!

Thursday, January 9, 2014

Sewing Organization Tip #4

I love Independent Patterns and have accumulated quite a few.  I described in my first Organizing post how I use binders for storing a record of all of my patterns.  I had many pattern boxes labeled "Miscellaneous", "Various", and "Various 2".  Well, I realized I was wasting too much time looking thru all of these boxes trying to find the correct Independent Pattern that I wanted so something needed to change.

My Mom was coming down for the weekend so I decided to task her with the sorting project.  Her job was to organize all of the independents according to their company name and alphabetize.  Independents like The Sewing Workshop that I have alot of patterns got their own box.  Every other company is organized in the A - Z boxes.  Now when I need one of these patterns, I can quickly go to the correct box!

Thanks Mom!


These might not be the prettiest boxes, but at least they are now organized.  Maybe I should recover the boxes and make them pretty?  Another thing to add to the "To do list" I guess.

Tomorrow's topic - Buttons and Hooks and Snaps - Oh My!

Happy Sewing!

Wednesday, January 8, 2014

Sewing Organization Tip #3

Get a grip on those sewing necessities!

We all need bias tape, hem tape, ric rac, zippers, trims, ribbons, etc., and they can quickly accumulate and get out of hand.  How many of us have had a box of  "Miscellaneous" stuff that we rarely look into and end up buying the same things over and over again.

A few years ago, I was blessed with a wonderful new neighbor who learned that I sewed.  His wife had passed away a few years prior and he was left with all of her sewing stuff and didn't have a clue what to do with it. Luckily, my sewing guild has an annual sewing garage sale so I told him I would sort thru everything, keep what I could use and then sell the rest for him at the garage sale.

So the next weekend we got together to start sorting.  Well, the wonderful new neighbor neglected to tell me that him and his wife had purchased a sewing store that was going out of business prior to his wife's passing so he had alot (and I mean alot) of stuff to sort thru.

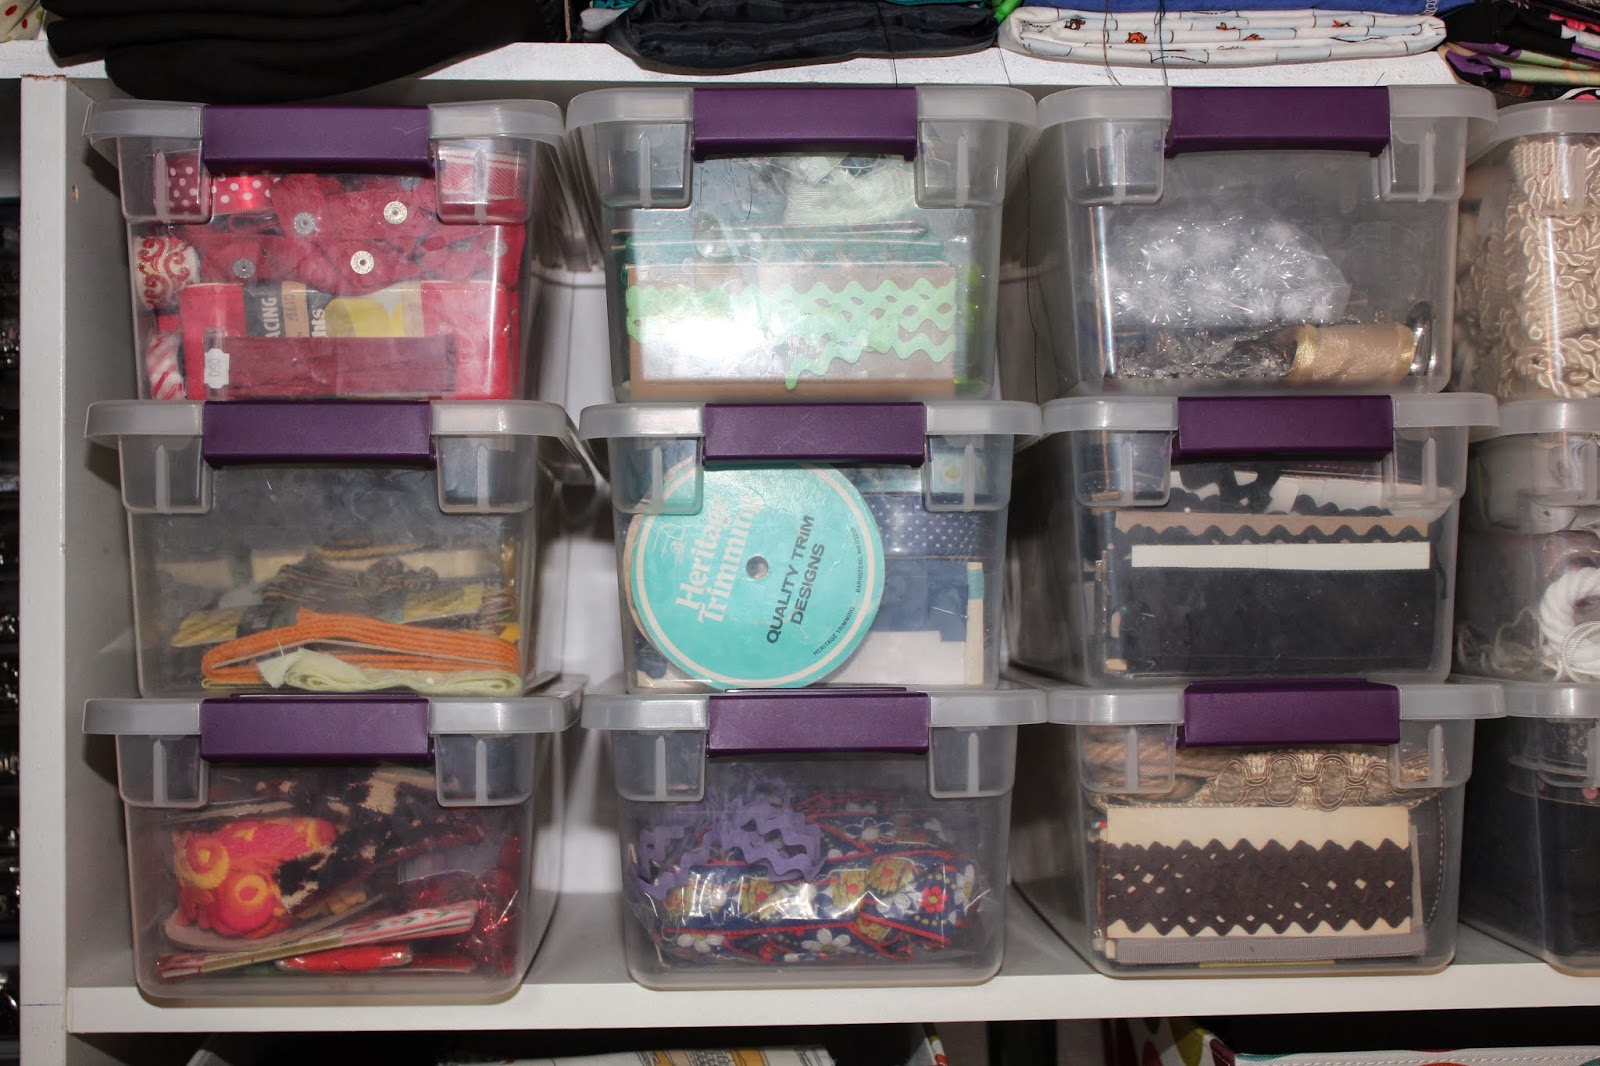
So after a few weekends of sorting, I ended up with alot of those sewing necessities I described above.  My solution - purchase some plastic shoe storage bins and organize according to color.


Now all of my trims have a nice box, sorted according to color and kept dust free!


Here are all of the zippers gifted from the neighbor as well.  I don't think I will ever need to purchase another zipper!
Many thanks to my wonderful neighbor and I hope this will give you an idea for storing your trims as well.

Tomorrow's topic - Independent Patterns.

Happy Sewing!

Tuesday, January 7, 2014

Sewing Organization Tip #2

Today's tip is for organizing fabric scraps.  By scraps I mean fabric pieces that aren't quite big enough to make another garment, but are still cool enough to keep for something.

I've had an alteration business for a number of years and have accumulated alot of scraps.  For some reason, I just can't bear to throw away those wonderful fabric cut off from prom dress hems or other fabulous garments.  I know one day I will use them for something!

Well after a few years of alterations, they were starting to create a big heap in the corner of my sewing room so I came up with a solution.  IKEA!


I bought two bookshelves with matching boxes and now my scraps have a home.  Each box contains a different color and now when I just need a little something for a embellishment or a small project, I head to the scrap box and pick out something fabulous!

I hope this tip will come in handy for you as well!  Tomorrow's tip - Getting a grip on your trims.

Happy Sewing!


Monday, January 6, 2014

Sewing Organization Tip #1

As sewers, we tend to accumulate alot of "paper" stuff.  Papers that needs to be organized and stored, and easily accessible for future reference.  Between magazines, patterns, sewing articles, class samples, just where does all of that stuff end up?

If you are like alot of sewers, stuff tends to get put in a "safe place" somewhere that you will never find again.  And you spend hours and hours trying to find just that one article, only to find lots of other things you forgot about in the process.

Well, I have a solution for all of the "paper" stuff that goes along with sewing.

Use Binders.


I use binders for all of my "paper" related sewing items.

For my patterns, I photocopy the front and back of the pattern envelope and put the photocopy in a clear plastic sheet protector and then file it in one of my pattern binders (according to what the garment is - jacket, pant, dress, etc).  The actual pattern itself, gets filed into a pattern box according to manufacturer and number.  Then, when I want to make a dress, I can just grab my binder and flip thru all of the photocopies of the dress patterns that I have and select one.  Then, go to the appropriate pattern box, pull out the pattern and voila!  Alot of time saved!

Some of the photocopied patterns in my binders
I do the same for my Burda Magazine patterns.  I photocopy the "All Styles at a Glance" page and just hole punch these and put them directly into a binder.  Then, I can quickly glance thru all of them, tab the ones I'm thinking about and then go to the correct year binder that the magazine is in and voila again!  Alot of time saved!


Burda patterns in their binder

Other items I keep in binders:
- Class samples with their instructions.  Usually in sheet protectors.
- Knitting instructions
- Embroidery ideas
- Sewing articles I've torn out of magazines.  Again - organized by their category for easy reference.
- Clothing styles I'd like to copy in the future
- Scrapbooking layouts I'd like to use in the future
- Cooking recipes

The possibilities for binders is endless!

I hope this tip will help tame some of your paper madness in the future.  Stay tuned tomorrow for a simple way to organize those fabric scraps.

Happy Sewing!