Pages

Showing posts with label Marcy Tilton. Show all posts

Sunday, October 7, 2018

Garbage can bound!

I should have known from the start that this dress would end up in the garbage can.  Here is all you are going to see of Vogue 9329 - a Marcy Tilton pattern.


There is nothing wrong with the pattern - I will actually sew it up again.  It was the fabric.  I just don't like it!  I purchased it from Girl Charlee and the fabric itself is good quality.  It's just the print that wasn't working for me.  Oh well - you sew and learn!

At least I could save my label.....


Oh well - You can't win them all!  I'm still adding this to the stats though - at least the fabric is now officially out of the stash! 

Latest Stashbustin' Stats:

Yardage for dress = 2.375 yards
YTD yards sewn = 90.05 yards
Remaining yardage to reach 100 yard goal = 9.95 yards

Happy sewing everyone!

Star

Sunday, June 5, 2016

How Does Your Garden Grow? - Vogue 9112

I'm a little late in completing my MAGAM Challenge for May this year.  But hey, with a theme like "Mad May", it required a little more time with added, self-inflicted frustration.  There is a reason the pattern envelope for Vogue 9112 says "Unsuitable for obvious diagonals" - but that didn't stop me from giving it a try.  Here's the finished product - I am super duper happy with it.


This is not my normal, fitted dress - but something roomy and flowy with a fabulous collar!  I was skeptical upon starting this dress knowing how roomy it was going to be, but, what the heck, I thought I would give it a try.

I started with my usual pencil drawing to determine a basic layout:


From there, things just started to fall into place.  I knew I wanted to incorporate bias piping into the dress somehow to accent the fabric I used for the collar.  So using some green and blue quilting cotton, combined with a cut-off from an old prom dress alteration, I cut bias strips and sewed the two pieces together off-setting them by 1/8".  When sewn into the seam allowances, it created the effect I was after:


Having sewn the dress together, I wasn't happy with how the front panel looked.  It just looked a bit plain to me.

I loved the collar though.  The pattern calls for just one collar piece to be turned and sewn along the edges.  I decided to double the collar and add some orange piping between the two.  I love how it turned out.

The side looked ok.

The back looked fabulous!

Just look at how well those plaid lines match up on the center back seam!  I'll go ahead and pat myself on the back right now for that!

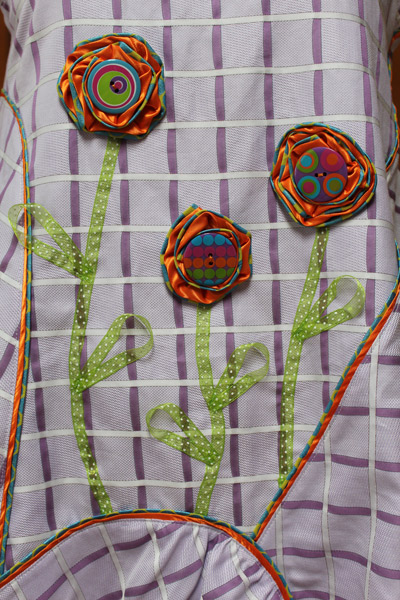
I had quite a bit of the double bias trim left over so I decided to start experimenting.  And I came up with making some interchangable flowers for the front.

Aren't they cute!!  I added some ribbon to make the stems of the flowers.

 And a fun little stacked button flower for the collar.

The cool thing about the flowers - you can remove them for washing and bonus - you can move them around to rearrange your bouquet!

Here's a quick tutorial on how to make the snap-on flowers:

First - start with a piece of felt and the double bias strips already sewn together.

Turn under the starting edge and start sewing the bias strip in a circular motion.  You will start with the outside circle and work your ways towards the center:

 Keep sewing and turning until you get to the size you desire.

Turn under the ending edge and finish your circle flower.

Trim the felt from the back:

And sew on a button to the front and a snap to the back and you are finished.  Helpful hint -  I found it easier to sew on the snap first and then the button.

I'm super happy with this dress.  I had doubts to start with given it's roomy factor, but I think it turned out super cute!  And it's a stash buster as well!

For this dress I used 2.75 yards of a Robert Talbott shirting cotton purchased from his store in Carmel Valley, CA a few years ago.  I'll guesstimate another 1 yard for the bias strips and collar piece for a total of 3.75 yards for this dress.  This brings the YTD total up to 48.625 yards!

Happy sewing everyone!

Star


Sunday, April 17, 2016

Two Vogue patterns - 9114 and 9153

The blouse is Vogue 9153 - a Marcy Tilton pattern.
The bottom is Vogue 9114 - a Kathryn Brenne pattern.

Both patterns have a "gathered area" on them that is out of the norm.  The blouse has a gathered section on the right hand side and the pants have gathered panels near the knees.

A little out of my comfort zone here by making something so baggy.  The blouse is fitted thru the shoulders and bust - which I like - and from the there on down, it is quite baggy.  I made a size XS and it was still very roomy.  The arms were a little snug for me so I ended up letting them out 1/4" from the armhole to the hemline.  

Here is the blouse on the dress form.  The front pieces are supposed to have separate facings sewn to them.  Instead, I altered the pattern to include the facings.  This made it much easier to match the plaid lines on the center front.

The gathered section on the right hand side sorta looks like a pocket, but it's not.  I wanted to highlight this area so I used the contrasting green from the pants as an accent piece.  Also - I added a buttonhole to the top plaid layer for the button.  The pattern only calls for a buttonhole on the bottom layer (the green layer), but this caused the top plaid layer to fold over and I thought it looked odd, so I added the extra buttonhole.

And can you believe I had these buttons in my stash that are the perfect match!  I purchased these buttons at a quilt shop in Montreal a few years ago.  I believe the shop has now closed but I paid $21.00 Canadian form them at the time.  Who knew they would later match this piece of cotton plaid purchased from the Robert Talbott outlet in Carmel, CA that was in my stash.

 Back view here.  You can see how it is nicely fitted thru the shoulder and armhole area.  

The sleeves have a cuff that I opted to use the contrasting green fabric on to highlight them.

The left side of the blouse has two darts that are sewn on the outside of the blouse.  To me, this looks like a mistake, but I'll go with the flow for awhile.  I may change this later so the darts are on the inside if it ends up bugging me too much.

Looks kinda cute here!

One day, I will figure out how to take a straight photo from the back.....

For the pants, I did make a practice pair out of some black linen I had in the stash.  I discovered two things with the practice pair.
First - I couldn't figure out how to tie just the one tie that is called for in the pattern so I opted for two ties on the green pair.
Second - I didn't like the way the small casing is sewn in the pattern because the raw edge ended up poking thru on my practice pair so I've made a simple tutorial below.
Oh - and I shortened the waist by 1 inch and the length by 1 inch too.

Simple tutorial for finishing the casing edge on the inset piece near the knee:
Here are pattern piece #7 (the facing - the plaid piece) and # (the inset - the green piece), sewn together, trimmed and topstitched.

On the straight side of the pieces, there are two small notches - kinda hard to see in this photo.

Sew a staystitching line 1/2" before and after the notch marking and then clip to the staystitching line.

Turn this small piece in twice, using the staystitching line as a guide for the finished edge and sew in place.

Next, with right sides together, sew the rest of the side seam, clip, press and turn.

And voila!  You have a nicely finished little edge so when the drawstrings are threaded thru the casing and pulled, the raw edge of the fabric doesn't slip thru to the outside.

Here's the bottom of the pants with two drawstrings in the panel.  Now I can pull them both and tie a bow.


So how are my yearly stashbustin stats coming along?  The blue plaid was from the stash but I purchased the green fabric to match it so I'm not going to include it in my total; however, the black practice pair of pants was fabric from the stash so it's going into the total!

Top = 2.75 yards
Bottoms = 2.375 yards
YTD yardage sewn:38.25 yards!

Happy sewing everyone!
Star

Saturday, March 26, 2016

March MAGAM Completed - Vogue 9108

My March MAGAM Challenge - More, More, Moreish March is complete and I am very happy with it!!  Here's Vogue 9108 - a Marcy Tilton pattern.  Warning, this post is quite picture heavy, but I hope you will enjoy it.

Front View


Side View

Back view
I first started this garment by doing a few pencil drawings to determine the placement of the fabrics.  I settled on version #5 as my final garment.


And the final version came out pretty darn close to the concept....


This jumper is described as "close fitting thru bust", but that's where the close "fittingness" stops.  I started by pin fitting the tissue pieces together on the dress form to see just how much I was going to pinch out before I even cut out the pieces.  Here's the front view just pinned together.


And side view - just look at how much tissue there is!!

Next, I started pinning out big triangles of tissue.  Starting at the top, I kept the bustline the same and then folded together a big chunk and pinned again.  I started by folding out 5 inches from the center back piece (for a total of 10 inches) and 10 inches on the side back pieces (for a total of 20 inches overall).  Here's a before and after pinning view of the back. 

And the same before and after pinning of the sides.

I did not pin out any fabric on the front pieces to start with because I wanted to see what the jumper would look like so far.  And, I knew I could take in the side seams to make it work.

On the back panel, the hem is supposed to end about 4 inches above the side back panels as you can see in the pic below.  I didn't care for that hemline, so I added in a piece to the back to make them even.  I guess I could have just extended the back panel a few inches, but that didn't occur to me at the time and I made a separate pattern piece for it.


After cutting everything out, I sewed all of the front pieces together and all of the back pieces together along with the straps and did a pin fitting of the side seams on the dress form.

I still needed to remove more fabric.  Here you can see the back side panel is pinned another 6 inches and same with the front piece.

The center back panel sagged funny on the upper back so I decided to pin out some more fabric and make further adjustments.

I ended up taking about 6 inches off of the straps - which moved the entire back section up quite a bit.  The good thing with doing this is I can wear this jumper with a strapless bra and without the t-shirt underneath on hotter days.

This picture isn't very clear, but you can see how much fabric I removed on the side seams.  The pic on the right has a faint line of red basting I did prior to sewing.

Here's the final garment once completed.

Of course I had to add in some fancy trims....

The back now lays nice and flat with no sagging with the addition of the box pleat in the back.

The criss-cross straps in the back are pretty cool.

Here's the original and my version front views.

And the original version compared to mine for the back.  You can see my straps are alot higher, there is alot less fabric in the back and the addition of the back bottom panel piece changes the hemline.

I am super happy with how this jumper and top turned out.  

I started with a size Small and after all of the tissue pinning adjustments and final alterations, I ended up removing 54" from the bottom hemline.  That might give you an idea of just how much fabric is in the original pattern.  

This entire garment was made with pieces from the stash adding a whooping 5.125 yards to my YTD total of 27.875 yards.  Whoop!  Whoop!  

Happy sewing everyone!

Star