I'm a little late in completing my MAGAM Challenge for May this year. But hey, with a theme like "Mad May", it required a little more time with added, self-inflicted frustration. There is a reason the pattern envelope for Vogue 9112 says "Unsuitable for obvious diagonals" - but that didn't stop me from giving it a try. Here's the finished product - I am super duper happy with it.
This is not my normal, fitted dress - but something roomy and flowy with a fabulous collar! I was skeptical upon starting this dress knowing how roomy it was going to be, but, what the heck, I thought I would give it a try.
I started with my usual pencil drawing to determine a basic layout:
From there, things just started to fall into place. I knew I wanted to incorporate bias piping into the dress somehow to accent the fabric I used for the collar. So using some green and blue quilting cotton, combined with a cut-off from an old prom dress alteration, I cut bias strips and sewed the two pieces together off-setting them by 1/8". When sewn into the seam allowances, it created the effect I was after:
Having sewn the dress together, I wasn't happy with how the front panel looked. It just looked a bit plain to me.
I loved the collar though. The pattern calls for just one collar piece to be turned and sewn along the edges. I decided to double the collar and add some orange piping between the two. I love how it turned out.
The side looked ok.
The back looked fabulous!
Just look at how well those plaid lines match up on the center back seam! I'll go ahead and pat myself on the back right now for that!
I had quite a bit of the double bias trim left over so I decided to start experimenting. And I came up with making some interchangable flowers for the front.
Aren't they cute!! I added some ribbon to make the stems of the flowers.
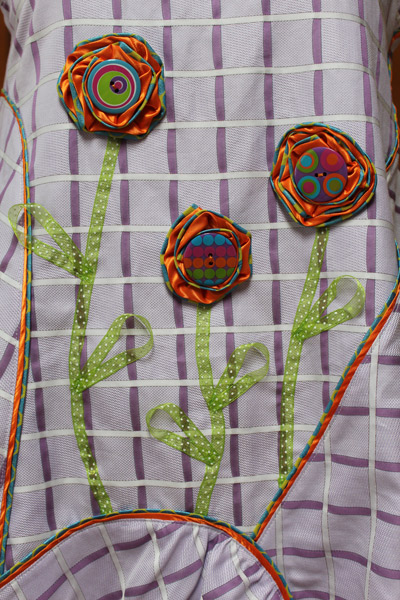
And a fun little stacked button flower for the collar.
The cool thing about the flowers - you can remove them for washing and bonus - you can move them around to rearrange your bouquet!
Here's a quick tutorial on how to make the snap-on flowers:
First - start with a piece of felt and the double bias strips already sewn together.
Turn under the starting edge and start sewing the bias strip in a circular motion. You will start with the outside circle and work your ways towards the center:
Keep sewing and turning until you get to the size you desire.
Turn under the ending edge and finish your circle flower.
Trim the felt from the back:
And sew on a button to the front and a snap to the back and you are finished. Helpful hint - I found it easier to sew on the snap first and then the button.
I'm super happy with this dress. I had doubts to start with given it's roomy factor, but I think it turned out super cute! And it's a stash buster as well!
For this dress I used 2.75 yards of a Robert Talbott shirting cotton purchased from his store in Carmel Valley, CA a few years ago. I'll guesstimate another 1 yard for the bias strips and collar piece for a total of 3.75 yards for this dress. This brings the YTD total up to 48.625 yards!
Happy sewing everyone!
Star
Showing posts with label Stacking Buttons. Show all posts
Sunday, June 5, 2016
Sunday, April 3, 2016
More pajamas!!
Once again, here is my favorite pajama pattern - McCalls 3017. This flannel fabric I purchased at a local quilting guild sale a few weeks ago. It actually didn't have enough time to make it into the stash stack as I cut out the pajamas in record time!
Pairing the flannel with some blue cotton striped fabric I had in the stash already and purchasing some polka dot piping at my local fabric store, this new set of pj's came together fairly quickly.
For the buttons, I used my stacking button technique with a large blue button on the bottom, followed by a smaller red button on top of that, followed by an even smaller green button on top of the red one. Because I'm not a stomach sleeper, I can use this technique quite easily on pajamas.
For the pocket I used a little more of the blue fabric with the piping in between. Pockets in pajamas are a must for me!!
Just a quick post today as I've used this pattern multiple times it seems redundant to keep reiterating the same thing about this pattern over and over.
I'm not sure if I should actually count the flannel fabric as part of my stashbustin' quest, but, I'm going to throw abandon to the wind and go ahead and count it - mainly because by using the flannel, I was able to incorporate the blue cotton that was in the stash so really, without the flannel fabric, the blue fabric will still be in the stash so I'm countin it!
Total yardage for pajamas = 5.25 yards
YTD stashbustin' total = 33.125 yards
I'm nearing the halfway point of my 70 yard total from last year. So far, I am right on track to beat that this year! Whoop! Whoop!
Happy sewing everyone!
Star
Pairing the flannel with some blue cotton striped fabric I had in the stash already and purchasing some polka dot piping at my local fabric store, this new set of pj's came together fairly quickly.
For the buttons, I used my stacking button technique with a large blue button on the bottom, followed by a smaller red button on top of that, followed by an even smaller green button on top of the red one. Because I'm not a stomach sleeper, I can use this technique quite easily on pajamas.
For the pocket I used a little more of the blue fabric with the piping in between. Pockets in pajamas are a must for me!!
Just a quick post today as I've used this pattern multiple times it seems redundant to keep reiterating the same thing about this pattern over and over.
I'm not sure if I should actually count the flannel fabric as part of my stashbustin' quest, but, I'm going to throw abandon to the wind and go ahead and count it - mainly because by using the flannel, I was able to incorporate the blue cotton that was in the stash so really, without the flannel fabric, the blue fabric will still be in the stash so I'm countin it!
Total yardage for pajamas = 5.25 yards
YTD stashbustin' total = 33.125 yards
I'm nearing the halfway point of my 70 yard total from last year. So far, I am right on track to beat that this year! Whoop! Whoop!
Happy sewing everyone!
Star
Saturday, October 12, 2013
Butterick 5923
Butterick 5923 is destined to be one of my favorite blouse patterns. The pattern comes with 3 views - a short blouse, like I have made below, a longer mid-thigh length tunic or an above the knee length dress. I can see myself making all three views.
Since my fabric has a directional print to it, I wondered when I was cutting everything out if this would matter. I think it turned out ok though. I love the cowl neck drape effect on the blouse front.
The blouse front is constructed of 3 different pieces, the front drape, pictured below, which is cut on the bias. There is also a separate collar which makes the styling of this blouse quite unique.
The 2nd piece that makes up the front is called a "stay" pictured below. The 3rd piece, which I don't have a photo of, is the bottom panel, cut on the straight of grain. The stay has a finished front edge that will show underneath the front bias drape when constructed.
Below is how the front bias piece and the stay are combined together to make up the front of the blouse. The stay does exactly what it sounds like - it helps the front bias piece to "stay in place" so when you bend over, you don't have this huge gaping front. It actually works quite well.
Here's a view of the back. The only pattern piece cut on the bias is the front drape - the rest of the pieces are cut on the straight of grain. There is elastic around the waist along with a belt.
My fabric has a coffee theme to it and finally, I can wear my little coffee cup necklace! I purchased it years ago and it has been in my jewelry box just waiting for the right fabric. Considering I've had this fabric in my stash for probably as long as the necklace, you would have thought I would have made something sooner!
You can barely see the collar in this side view. The collar would be more prominent if my print wasn't so busy, or, if I did a contrasting collar and belt - now there's a thought for another blouse!
The sleeves roll up and are held with a tab and button. I did my usual button stacking technique. For some reason, I just can't bear to use one little button on it's own - I think they look much better with a coordinating friend! You can see the print on my fabric much better in this pic.
I hope you will consider making this blouse. It's quite comfortable to wear and I'm sure I will get years of wear out of it.
Happy Sewing!
Since my fabric has a directional print to it, I wondered when I was cutting everything out if this would matter. I think it turned out ok though. I love the cowl neck drape effect on the blouse front.
![]() |
| Front View |
The blouse front is constructed of 3 different pieces, the front drape, pictured below, which is cut on the bias. There is also a separate collar which makes the styling of this blouse quite unique.
![]() |
| Front bias piece of blouse |
The 2nd piece that makes up the front is called a "stay" pictured below. The 3rd piece, which I don't have a photo of, is the bottom panel, cut on the straight of grain. The stay has a finished front edge that will show underneath the front bias drape when constructed.
![]() |
| The front stay piece |
![]() |
| Front and stay combined |
![]() |
| Back view |
My fabric has a coffee theme to it and finally, I can wear my little coffee cup necklace! I purchased it years ago and it has been in my jewelry box just waiting for the right fabric. Considering I've had this fabric in my stash for probably as long as the necklace, you would have thought I would have made something sooner!
![]() |
| Coffee necklace |
![]() |
| Side view |
![]() |
| Close up of sleeve |
Happy Sewing!
Friday, September 13, 2013
Vogue 8307
Elvis anyone?
![]() |
| Front View |
I call this my Elvis Jacket. I feel like I should wear this in Las Vegas to an Elvis impersonation show or something. The pattern is Vogue 8307 and I made it a few years ago. The main fabric is a wonderful felted wool that I picked up during a vacation to Austria. The fabric had been aging in my stash until I found the perfect fabric for the collar on another vacation - this time to England. I love the collar on the jacket - it can either be worn standing up (as in my pictures) or laying down for a flatter look. I like it standing up.
![]() |
| Back view |
![]() |
| Button Stacking |
![]() |
| Close up of fur collar |
![]() |
| Side View |
Happy Sewing!
Sunday, August 18, 2013
Simplicity 1881
Leftovers can make cute things too!
I've nicknamed this dress "The Circus Tent" because I think that's what it ended up resembling.
It's cute, but definitely looks like a circus tent. This pattern is meant to be made out of a knit fabric, but I had a woven on hand. I made a muslin and needed to add about 3/8" to a size 12 pattern to accommodate the woven material.
The main circle material is a rayon fabric left over from a top I had already constructed and I was determined to not buy anything to complete the dress - so I headed to my stash to see what I had.
I had some green linen that just happened to match the green in the circle print so I used that as well.
The dress has a center zip down the back. I had a metal white zipper on hand - not my favorite, but it was in the stash so I wanted to use it up. The lining is some cheap polyester lining I already had on hand as well.
I decided to include piping along the neck band and the midriff band. The piping material is a multi-stripe quilting cotton, again, left over from a previous project.
Here's a close up of the piping and the green midriff band.
All in all, I think it's kind of cute, but it still reminds me of a circus tent.
Happy Sewing!
I've nicknamed this dress "The Circus Tent" because I think that's what it ended up resembling.
It's cute, but definitely looks like a circus tent. This pattern is meant to be made out of a knit fabric, but I had a woven on hand. I made a muslin and needed to add about 3/8" to a size 12 pattern to accommodate the woven material.
I had some green linen that just happened to match the green in the circle print so I used that as well.
The dress has a center zip down the back. I had a metal white zipper on hand - not my favorite, but it was in the stash so I wanted to use it up. The lining is some cheap polyester lining I already had on hand as well.
I decided to include piping along the neck band and the midriff band. The piping material is a multi-stripe quilting cotton, again, left over from a previous project.
Here's a close up of the piping and the green midriff band.
I also decided to make some earrings to match. These are made from stacking buttons and adding some posts with beads on the bottom.All in all, I think it's kind of cute, but it still reminds me of a circus tent.
Happy Sewing!
Sunday, August 4, 2013
Simplicity 2927
This blouse is a Project Runway inspired pattern thru Simplicity. The pattern has different "design elements" you can select to customize your blouse or dress. I selected the petal style sleeves with pockets on the front. I also added the piping around the neckband to help highlight it a little more.
![]() |
| Simplicity 2927 front view |
The fabric is a floral print pique that I picked up at a sewing garage sale a few years ago. It has been aging in my stash for quite awhile until the right project came along.
![]() |
| Simplicity 2927 back view |
My first attempt at stacking buttons (a favorite technique of mine) was not successful as you can see from the picture below. After letting the blouse rest on my dress form overnight, when I came back into my sewing room the next day, it looked like two eyes were starring at me! I'm sure my co-workers would not appreciate this. Would I look like I had four eyes instead of two, and if I put my glasses on, would I look like I had six eyes? I decided I didn't want to find out, so I opted to find something else in my stash that would work.
![]() |
| First attempt at two buttons - not successful |
Luckily, I was able to find the perfect white flower button in my stash that worked with my stacking technique. It's a large black button, with the flower white button on top of that, with a black ball button on top of the flower button. You just sew all three on at one time! Instead of a buttonhole, I used a snap directly behind the button stack. I also used a small snap on the opposite site of the flap to help keep the rest of the collar in place. With the addition of piping, I think my top turned out quite nice!
![]() |
| Final button selection - much better! |
Happy Sewing!
Subscribe to:
Posts (Atom)


