Pages

Showing posts with label Lined. Show all posts

Thursday, August 31, 2017

August MAGAM Completed - my Oriental/Russian/Mongolian Coat?

For "Artful August" my Indygo Junction's Trench Topper started out with an oriental flair but has turned into something quite different.  I think it looks more Russian/Mongolian rather than Oriental.  Could it be because I changed the collar to a stand-up collar and that the collar and cuffs are made from fake fur?  Who knows!

The finished product:


Should I be holding a sword in this picture?

I love the mix of prints and patterns in the coat.


Oh and yes - when I actually do wear this coat, I'll be wearing pants or a skirt underneath it.  It was 103 degrees outside this day when I took the photos so I wasn't about to venture outside in a coat trimmed in fur to take some pics!  It was hot enough inside with shorts on and my hair pulled up!


Back view is super cool!


And I'm just throwing this one in for kicks.  Every seam in the coat is topstitched, although it's hard to see in this photo.


So lets review how this whole project started out.

Here's my starting bunch of fabrics.  The main fabric in the middle was my inspiration fabric and I recently purchased all of the fabrics to the left of it to coordinate.  The inspiration fabric was purchased at one of the guild's sewing garage sales a number of years ago.  There wasn't alot of the fabric and I thought it might turn into a purse or totebag one day, but I really like the coordinating fabrics that went with it so it was destined to be this coat!  The fabric stack to the right are ones I pulled from the stash that matched, but the only one I ended up using was the fake fur.  The polka dot on the bottom I used as the lining, and I only trims I used from the starting pile were the two ribbons in the top middle.


After drawing a few pictures and figuring out the fabric placement, I finally settled on #3.  I did end up changing that red sleeve to a blue sleeve and the tab I had planned for the collar just didn't work.


I pinned the pieces to my dress form as I cut them out.  This really helped  make sure I had the right pieces in the right places.

And here it is as it was coming along with the main body sewn together, the bottom panel pinned on, the belt pinned on and I was starting to play with the ribbons and trims.


The buttons, closures and belt details:

For the buttons, I knew I wanted to use the square buttons in the coat as they were my Grandmother's buttons - they may even been bakelite but I'm not sure.  The square buttons looked a bit add next to all of the other circular shapes though so I found these black buttons at the store that would work well behind my square buttons.  The square buttons had a rather large shank on the back and the black ones are curved so the shank fits in it's little dip just perfectly.

I used small round elastic to make loops for the buttons.  

The button on the belt has a snap closure behind it.  I had one black covered snap set in the stash so this worked out perfectly.

The mock belt is trimmed with yellow/red piping and stitched into place around the waistline.  


The lining:

Isn't the lining fun!?!?!?  The pattern doesn't call for a lining, but I added one.  The facings are trimmed with the same yellow/red fabric I used for the piping around the belt.  


Back view:

I happily added my label to this coat.

The ending:

That fake fur (along with other threads) was everywhere when I finished the coat!


I am super happy with how this project turned out.  Now if the weather would ever cool off, I might be able to wear it!  And for everyone following along with my stashbustin quest - here are the latest numbers:

Stashbustin stats:
Total yardage for this coat (outer fabric and lining) = 6 yards
YTD yardage = 59.16

Happy sewing everyone!

Star

Sunday, July 10, 2016

Opposites Attract!

The theme for July's Make A Garment a Month Challenge is "Opposites".  A suggestion from yours truly!

Opposites can take on many different interpretations - opposite season; opposites on the color wheel; plaids and stripes, etc - you get the idea.  My opposite is going to be opposing seasons.

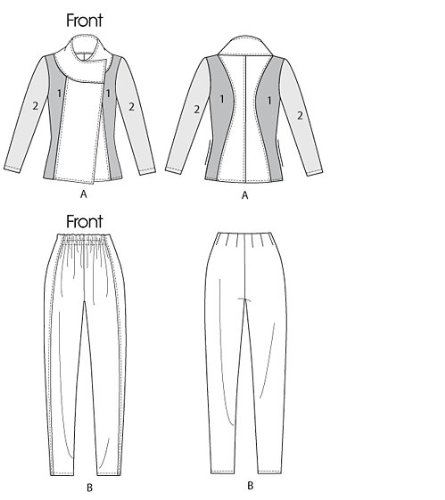
In my part of the world we are currently in mid-summer - the perfect time to make a quilted winter vest!  I will be using Vogue 8757 as my pattern.  This is a jacket pattern, but I'm going to turn it into a vest instead.


I think the line drawing gives you a better idea of the actual jacket/vest.


You might recognize the main fabric I'll be using for the vest.  The fabric on the far right is a leftover piece of purple quilted fabric from a Minoru Jacket I made a few years ago.  The middle fabric is a satin cut-off from a prom dress alteration and the fabric on the left is a nice piece of cotton from the Robert Talbott outlet in Carmel Valley.


You might also recognize the piece I'll be using for the lining.  This was a top I made from the remnants of the Minoru Jacket lining - New Look 6245.  I was never really thrilled with this top and it's been hanging on the alteration rack for quite awhile.  I really like the print on this satiny fabric.

So for this project - I'll have quite a few iterations of the theme "opposites" going on:

- Opposite Season - making something for Winter when my current season is Summer.
- Old versus New - turning something old into something new again by reusing the old top for the lining.
- Zipper versus Snap - I'll be changing to a zipper closure instead of a snap closure as suggested in the pattern.

If I think of any other opposite in the sewing process - I'll be sure to mention that in my final project post.

Happy Opposites Sewing everyone!

Star


Monday, January 18, 2016

January MAGAM - Burda 7342 - Feelin' Kinda' Scottish?

My January MAGAM is a plaid skirt using Burda 7342.  I LOVE THIS PATTERN!!!!  In fact I like this pattern so much, I already have skirt #2 cut out!  It will be a basic black skirt with white topstitching.  


I got a little carried away with the fabric and decided to make a matching scarf.  

I'll probably wear a black sweater with this rather than the turtleneck below - the turtleneck is a bit baggy....


The wool plaid is very loosely woven so I interfaced the front and back yokes and added some seam tape along the stop seam lines to stop it from stretching.


Here's the skirt on Elizabeth.  The skirt took a few hours to lay out due to the plaid and wanting everything to line-up.  Also - there were two flaws in the fabric that I needed to work around.  As you can see, the front and back skirt portions are cut on the bias.

The right side plaid lines up, but the blue and gray plaid lines are alternating.  I think because the plaid isn't a mirror image of itself, I couldn't get this one side to line up properly.  The black lines are correct though.

The sides line-up:

The mock pocket flaps line-up:

Here's the back view:

After alot of pining, my invisible zipper lined up perfectly.

The left side plaids line up perfectly.

And here is Elizabeth sporting her new outfit - I think she likes it too!

I had some black fringey stuff left over from another project so I added it to the bottom of the scarf.

The lining is comprised of three different materials - a cotton on the top, a rayon on the bottom with a trim from the stash hand sewn between the two.

Here's the back view:

I first tried the to use the floral trim from above on the hemline, but it ended up being too stiff so I replaced it with some lace hem trim and it lays much better now.

Total yardage for this skirt = 4.375 yards.  Not a bad start to stashbustin 2016!

And, drum roll please......
I finished an alien project too!  Remember this blouse?  All I had to do is resew one of the button stacks and lower the armholes 1" each side.  Done!  One alien down, too many to go, but it's a start! My project wall now has a little more room on it.


Happy Sewing everyone!
Star

Friday, March 6, 2015

Vogue 9031 - A Traffic Stopper!

Another stashbustin' skirt added to the wardrobe.  This skirt was made from the remnants of this jacket.  I made View A (the black/gray one pictured below), but with a small change.  See those little pieces on the upper side fronts that are cut from the contrasting fabric?  I decided to cut those little pieces from the tweed fabric instead of my contrasting fabric to make it blend better and I think I made a mistake.

When my skirt was all finished and it was hanging on the dress form patiently awaiting it's photo shoot - the DH walks in and says "Oh look - there's an arrow on the front".  An arrow, what do you mean an arrow?  Of course I hadn't even noticed the arrow shape until he pointed it out (no pun intended).  Now -  that's all I can see.  Once you see something, you can't "unsee" it. Just by changing those small little contrasting pieces - my skirt now has an arrow pointing up!  The backside always had the arrow hidden amongst the design lines, but of course I couldn't see that initially from the line drawing on the pattern envelope either.

Front view

Side view

Back view
Remember these shirts from the 80's?  This is what the skirt now reminds me of.
Baby in a corner


What happens if I fall down on the sidewalk while wearing it - will I be mistaken for a traffic sign and cause an accident - it is a green arrow after all!  What if I'm in the mood to do cartwheels on the sidewalk one day - what will happen then?  I can see the news headlines now - WOMAN'S SKIRT MISTAKEN FOR TRAFFIC SIGNAL - CAUSES MAJOR ACCIDENT AT INTERSECTION.  Will I get a ticket for wearing the skirt if this happens?  Would that be considered a wardrobe malfunction? What if I volunteer to hold the stop sign when school children are crossing the road - what then?  People won't know what to do - STOP, GO, TURN oh my!  I really need to think about my day ahead before dawning this skirt in the morning!

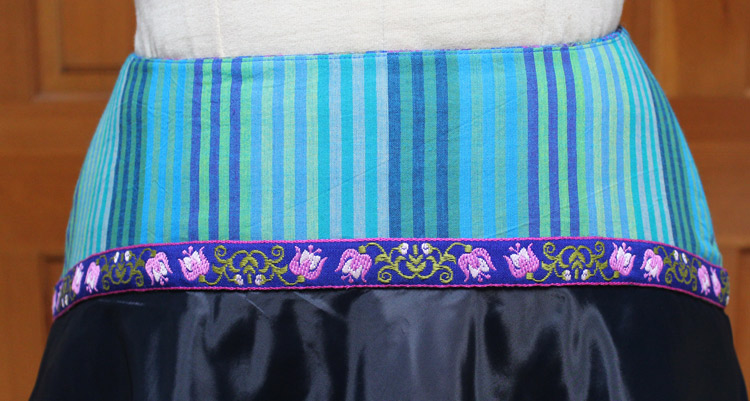
Before I had realized the traffic stopping possibilities of this skirt, I spent quite a bit of time adding extra touches to the inside finish of this skirt.  One little touch I am really happy about is the fun trim I added to the bottom hem on the inside.


This skirt is designed to be unlined and have a raw edge for the hem on the bottom.  Since my tweed fabric frays so much, I figured I would need to really hem it somehow and not settle for the frayed strings that would be tickling my legs all day.  After trying it on, I realized there was only room for a small 1/2" hem and that just wouldn't do so I rummaged thru my stash and found this trim.  I've had this trim in my stash since - well - probably sometime in the 70's and it's been waiting to bring it's bright and cheerful self out out of the trim box for 40+ years.

There is an advantage to this trim.  It acts as a sort of horsehair braid along the bottom edge and the hemline flares out just a little more than it did without the trim and I kinda like that. I also added some teal ribbon between the facing and the lining pieces.


Here's the process I used for sewing the trim to the bottom hem:

First - sew a basting line 1/2" from the bottom edge.


Next - with the right side up on the fabric, sew the wrong side of the ribbon to the edge, lining the edge of the ribbon up along the edge of the basting line.


Next - remove the basting line.


Next - turn and press the ribbon up onto the inside of the skirt and pin.  Hand sew the ribbon in place along the top edge.


Here's the stashbustin' numbers for this skirt:

Skirt: 1.125 yards
Lining: 1.125 yards
Total: 2.25 yards
Total YTD: 18 yards!!

That's it for today.  Wish me luck when wearing this skirt.  If it causes accidents, I will let you know!

Happy Sewing everyone!